
There are various sizes and packages of the Central Pneumatic, I chose a pull around, 2HP, 8 gallon model that set me back about $120. It would do what I needed done, in the size I needed it done in. The different models appear to use similar components, have a very similar build quality and feature list, so this review should be applicable and don't worry if you go a size or two up or down from the model shown.
The Central Pneumatic arrives very well packaged; enough packing to protect but not so much you have to be creative to get rid of, only minimal assembly required and no ridiculous amount of tape to remove to open the box. STEP 1: unpack the parts and complete minor assembly.
The Central Pneumatic is an oiled compressor. I prefer oiled compressors over their cousins the oil-less types as the oiled compressors last longer and tend to be much quieter (still loud enough to wake the baby just not loud enough to wake the dead). The thing about oiled compressors is YOU CAN NOT RUN THEM AT ALL WITHOUT OIL. Running an oiled compressor without oil will likely cause irreparable damage to the pump soon after turning it on. The Central Pneumatic ships with an annoying amount of warning stickers to advise you of this issue;

I believe there are five stickers stuck to various parts of the compressor warning you of impending doom should you be so foolish as to turn it on before inserting oil. The bottle of oil that comes with the compressor is even in a plastic bag that is zip-tied to the power cord. Yes, yes, yes, I understand....don't turn it on before I put in the oil. STEP 2: remove annoying warning stickers and clean the sticky residue they leave behind.
The next step would be to add the oil. This is simple, just remove the fill plug on the back of the motor and dump the entire bottle in, I highly suggest using a funnel as the oil port is nestled against the motor and is a fairly small hole to hit without spilling. The instructions say fill to the level mark....surprisingly this is the full bottle, not a drop more, nor less.
Now the funny part; with all the warnings about putting oil in, they draw virtually no attention to the break-in process. With oil lubricated engines, it is very important to run them through a break-in period. The break-in period helps clean small bits of metal left over in the manufacturing process as well as smooth out pieces as they rub together under force for the first time. This process will produce small bits of waste material and metal which must be removed after the break-in so they will not wear down the internals of the compressor like sand paper.
The break-in process for this unit is simple; (with oil levels at full) run the compressor for one hour. I achieve this by slightly opening the bottom drain enough that the compressor can still build pressure. With the valve slightly open, the compressor will build pressure to 125psi and then turn off, the air will leak out and when the pressure reaches 90psi the compressor will turn back on. This on/off cycle should automatically repeat for an hour.
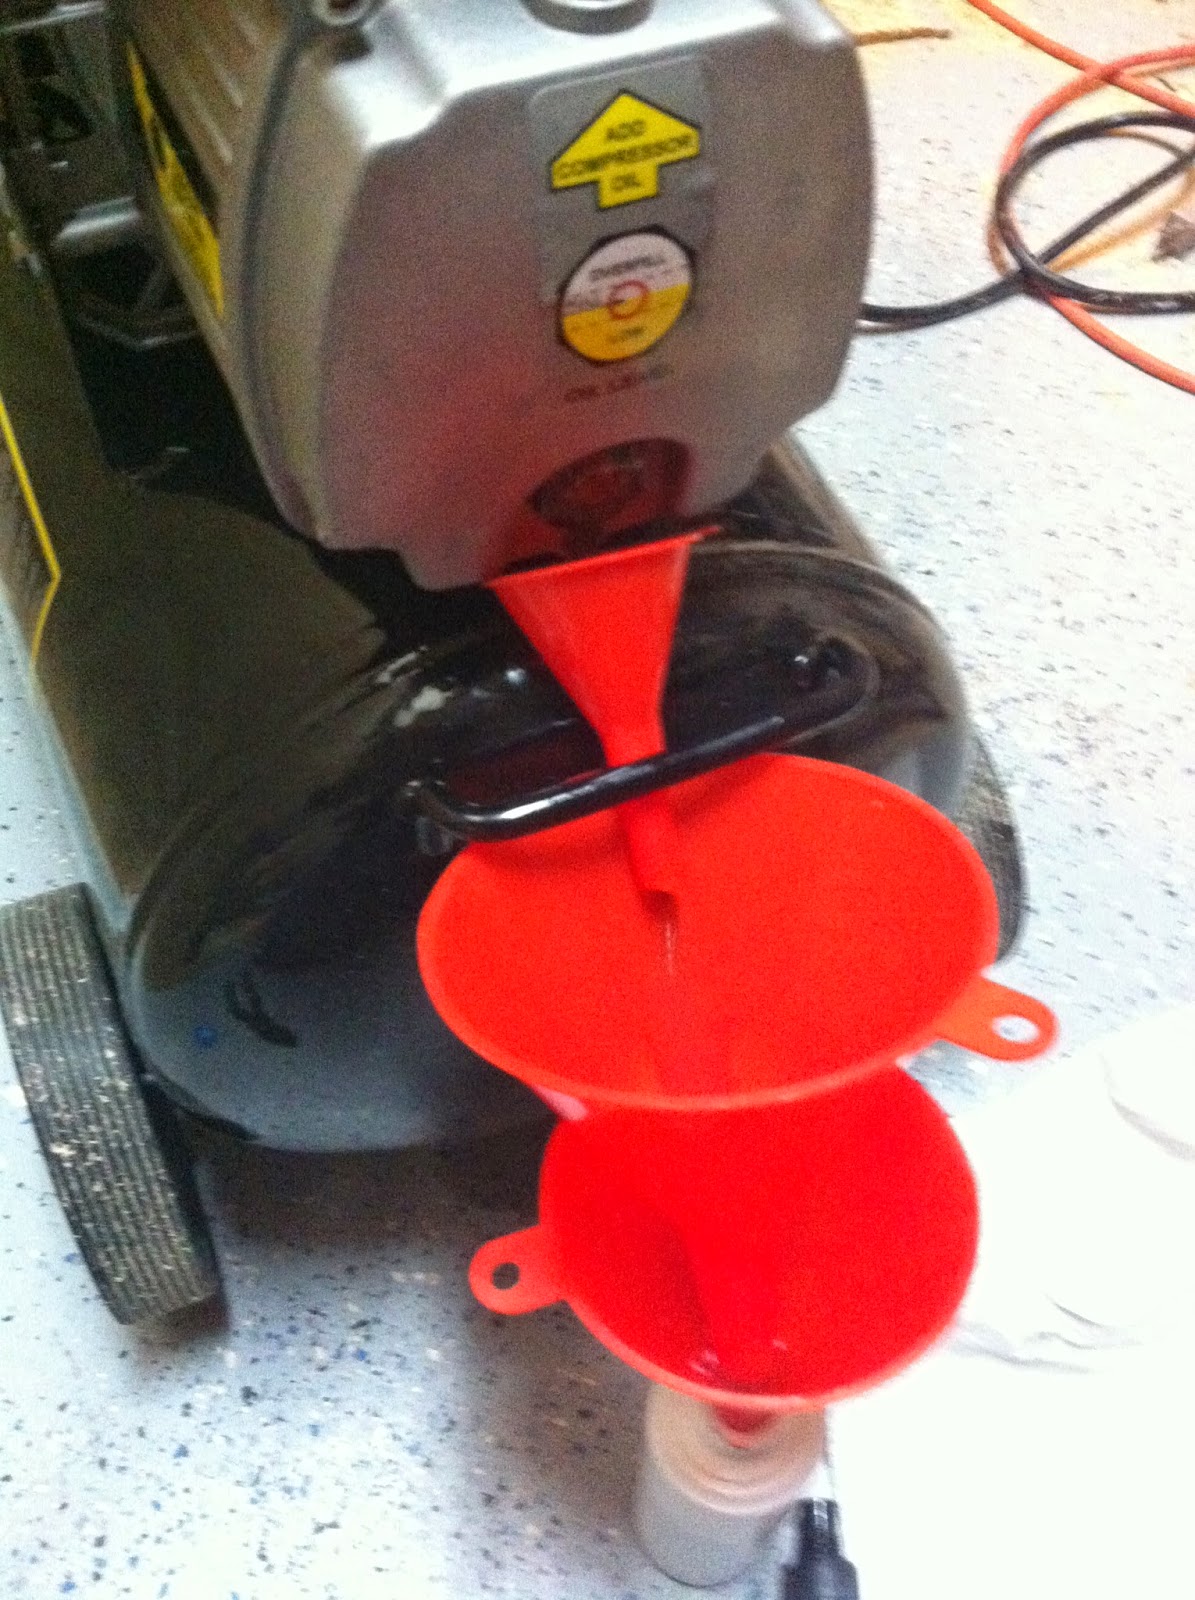
After the break-in hour, turn off the compressor and let it cool. You will need to drain the fouled oil, it will be noticeably darker coming out than it was when it went in. Here's where my first real complaint comes in. The oil drain is a simple hole filled with a screw at the end of the compressor motor. The size of the drain means it will drain slowly but moreover the location of the drain means you have to hold a funnel in an odd position for quite some time and since that oddly placed drain is snuggled not only away from the edge of the tank, it is also behind the carry handle making it impossible to put any normal sized funnel in there. Luckily I ordered a funnel kit with a nice assortment of sizes and Jerry-rigged this little gem so I didn't have to squat for 20 minutes holding a recovery vessel.
After following the instructions for break-in and draining the old oil, you discover my next complaint; there's only enough oil for the initial fill. Good thing I ordered more compressor oil with my compressor. Remember to buy more compressor oil with your compressor or it will be a french-filled drive to the local home improvement store. You will want extra oil anyway as it is good practice to change frequently, especially after the first few real uses.
Now that the compressor has had it's break-in, it can be used for real work. This unit passes the noise test as it does make noise like any other compressor but not anywhere as much noise as my little oil-less pancake compressor 1/8th the size. The compressor is a little slow building up pressure as my use of an air hammer would outrun the air pressure being made and I found myself waiting from time to time for the pressure to build back up. Luckily the 8 gallon tank meant I could make substantial runs at removing floor tile before running low. Admittedly air hammers are demanding tools and probably on the outside limits of what this compressor was ever designed for and less demanding tools like nailers would never see a pause.
Overall, the Central Pneumatic Air Compressor has a satisfying build quality. A few quirks aside, like the oil drain plug and some pretty cheap looking pressure gauge dial faces (they look like they were done on an old photocopier), this tool is rather solid. I can admit freely I was a bit nervous buying a compressor for so little but I must say I am pleasantly surprised. I have little doubt this new compressor will be a more than adequate replacement for my old workhorse and this time I promise to take better care of it.
-ciao

Nice post. I was searching for an air compressor so long that will provide me a quality service in a relatively low price and finally found in compressor guide reviews. It has the best air compressor reviews that will give you a perfect basic information about the air compressors thus help to choose the right one appropriate for your job.
ReplyDelete